Got a bunch of home-improvement dreams but you’re not quite sure where to start? Let a free or inexpensive three-dimensional floor plan program be your guide.
While making a 3-D model is no substitute for professionally crafted plans and blueprints, it will give you a way to experiment with ideas before you hire a contractor or an architect. And some programs are simple to use: If you can use a tape measure and drag objects on a computer screen, you have the necessary skills. Here’s how to get started.
Step 1: Take a Measured Approach
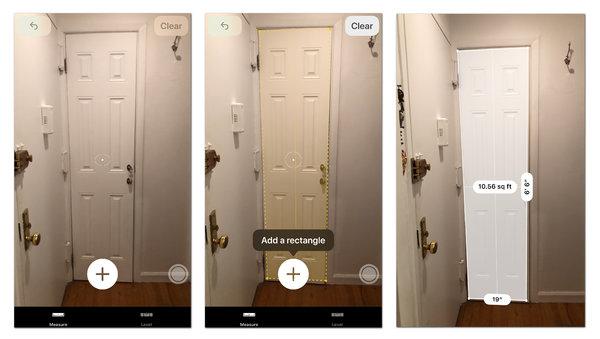
You’ll need all the measurements of the room or project area in order to recreate it. A locking 25-foot retractable tape measure is the time-tested tool, but you can also get rough estimates with augmented-reality tools like Google’s free Measure app for Android or Apple’s similarly named iOS 12 Measure app. Some apps, like Magicplan for Android and iOS (prices start at $3), can do both the measurements and put together a floor plan.

Apple’s Measure app uses augmented-reality technology to detect the rough dimensions of objects, but using a good old-fashioned tape measure is more precise.CreditThe New York Times
Measure everything: the length, width and depth of the walls, doors and windows in the space, and don’t forget fixtures like radiators. You should also grab the dimensions of the furniture, appliances and other items in the renovation zone. If you plan to buy furniture, appliances or shelving, collect the measurements from the product’s specifications online (or on the box).
Step 2: Find Friendly Software
You can find plenty of home-design apps in a range of prices in your app store. And some retailer apps, like those from Build.com and Wayfair, use augmented reality to show virtual objects like furniture in a room.
But if this is all new to you — or if you’re adding on a room — the free edition of Sweet Home 3D for Windows, Mac and Linux computers may be your best bet, because you get an intuitive interface and many design options. The application has many appealing features for beginners, including an illustrated user guide and video tutorials. (A full version of Sweet Home 3D with more design options is also available for less than $15 in the Microsoft and Mac App stores.)
Sweet Home 3D has a free online edition that works in a web browser. SketchUp Free is another browser-based drawing program and has paid versions.
Step 3: Lay Out a Floor Plan
Next, make a scale model within the program’s work space, which typically looks like a grid of squares representing feet or meters. Refer to your list of measurements and use the program’s tools and grid to create walls, rooms, doors and the other central elements.
If drawing a room from scratch intimidates you at first, check your program to see if it includes templates or sample files. With a little clicking and dragging, you can usually modify these examples to match the outline and measurements of your own room.
Step 4: Add Interior Furnishings
After you map out the room’s exterior dimensions, start filling in the interior with furniture and appliances. Most design apps have an object browser window you can use to drag 3-D models of common items (like tables, sofas and bar carts) into your floor plan where you want them to go. More stylish furnishings may require an in-app purchase.
Depending on your software, you may also be able to select different window and door designs, as well as stylized wallpaper, flooring, curtains and other furnishings to make your model look as close to your renovation dream as possible.
Step 5: See It in 3-D — and Share
Some apps provide a split-screen view between the 2-D floor plan and a 3-D model that you can spin and rotate. Other programs display the project in the flat 2-D view and you add the extra dimension with a tap or click. Seeing your room in 3-D can give you a better idea of how everything works within the space, and can highlight issues you may not have seen on the flat floor plan, like fire sprinklers that block cabinet doors from fully opening.
When you’re satisfied with your creation, move on to the next phase. Print it out to use it as a guide as you work, or send a copy to your contractor so you’re both on the same page when it comes time to start the job.


