Many brides are choosing to style their own hair these days, whether to avoid the fuss of sitting through hair trials at the salon or because they’re planning a low-key celebration.
“D.I.Y. hairstyles have become popular due to the quarantine when brides had to learn to do their own hair for their wedding,” said Sarah Potempa, a New York-based hairstylist and a founder of the Beachwaver, which provides virtual stylist consultations.
To offer some inspiration, we’ve rounded up a few of our favorite styles, plus expert tips on creating these looks. You can easily add length and volume, if need be, through braiding hair or clip-in hair extensions, like those sold by Luxy Hair. Helen Kenny, a stylist based in Toronto, advises: “When adding clip-in extensions, be mindful of where you attach them so that the base doesn’t show. And don’t be afraid to play with the placement of the extensions to find what works best for your hairstyle.”
Luxy Hair offers online tutorials to help.
Hair stylists recommend practicing various styles weeks before the wedding and taking photos of them from all angles to get an idea of how they might show up in pictures.
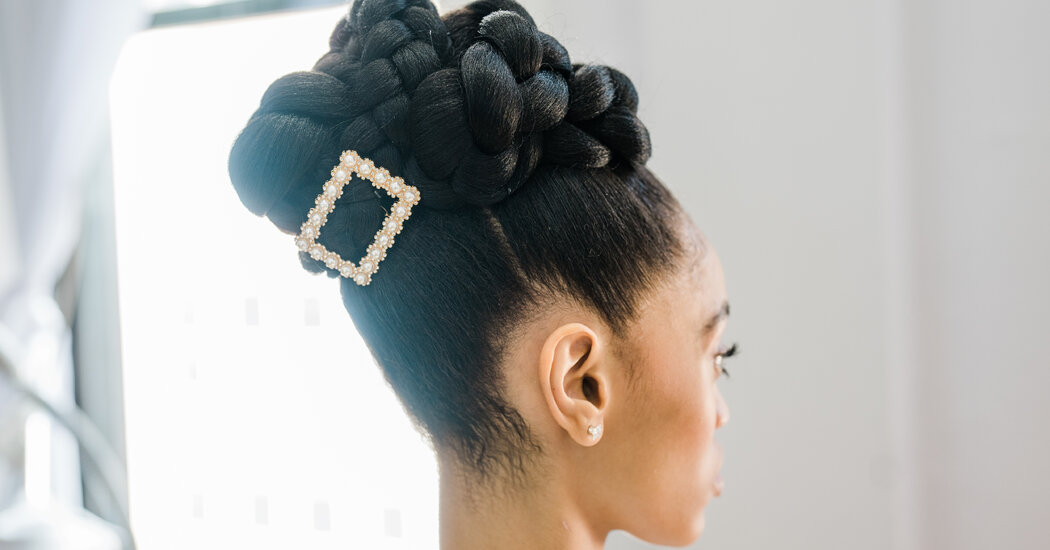
Braided Bun
This glam braided bun does a quick change into a dramatic ponytail to go from ceremony to reception. To style this two-in-one look, you can use clip-in hair extensions to add volume and length.
What You’ll Need:
Directions
Step 1
Part your hair into two sections from ear to ear.
Step 2
Create a ponytail with the top section. Attach braiding hair or a clip-in ponytail extension at this step if you are adding volume and length.
Step 3
Create another ponytail with the bottom section of hair. Attach braiding hair or clip-in ponytail extension if needed.
Step 4
With the top ponytail, make one braid. With the bottom, make two separate braids. Crisscross the three braids and wrap them around each other to create a bun, pin in place while wrapping.
Directions
“Blow your hair out straight and smooth before clipping in the extensions, then pull all the hair to one side and braid while including the extensions,” Ms. Kenny said. “Add additional pieces of extensions on the side you’re braiding if you want more volume.”
You can finish the look with decorative hair pins or flowers placed throughout the braid.
Twisted Bun
This style takes the traditional bridal bun to the next level.
Directions
Make a front or side part, then create two-strand front twists that lead into three-strand braids on both sides. Then pull hair into a low ponytail and roll the ponytail up and to one side, creating a voluminous bun and pinning in place.
“Prep hair before styling by applying volumizing mousse and blow dry, concentrating on lifting the roots and smoothing the ends,” Ms. Potempa said. “Then curl with a large-barrel curling iron to add more volume and texture. Use a styling product that offers some grip for braiding and hold.” She suggests the Beachwaver Braid Balm.
Amplified Bun
A classic bun compliments almost any bridal look, and this one has a playful touch with soft tendrils.
Directions
Create a thick top bun with any length hair by adding a hair piece, like the Luxy Clip-In Bun. Pull your hair back into a bun with a hair elastic, then attach and wrap the clip-in around your bun, making sure it’s secured under the hair elastic. “If you have textured hair, work with your natural curl and leave some pieces out around your face to make the look more natural and less done,” said Kenny. “If you have straighter hair, add curly tendrils with a curling iron.”
Half-Up Braid
Here’s a fun twist on the half updo.
Directions
After curling medium-size sections of hair, make a front part as desired.
Section off two pieces on either side of the part, then braid each section and pin one braid on top of the other across the crown of your head.
“For a soft, ethereal look, lightly pull apart each braid to loosen it,” said Brittany Lo, the founder of Beautini, a New York-based beauty services company focused on brides.
Crown Braid
An edgy crown can dress up any bridal look.
Directions
Part hair in the middle and while leaving one side down, create a low, braided side bun on the other.
With the hair that is down, make four to five medium-size braids and then wrap them around your head, above the bun, to create a crown-like effect, pinning as you go to secure the style.
“For this particular look, I wrapped a chain in-between the braids for a bit of drama,” said Cheryl Bergamy, a New York City-based hair stylist.
Textured Waves
The key to this romantic hairstyle is curling all of your hair toward your face.
Directions
“It’s important to wrap sections of hair around your curling iron twisting toward the front and use a texturizing hair spray, like Shu Uemura Wata Wave Texturizing Spray, to give body to the hair,” Ms. Lo said. “Then gently comb through to the ends.”
Beach Waves
To style your tresses into this boho bridal favorite, you’ll need a curling iron, such as the Beachwaver Pro 1.25, which has a rotating barrel. If you’re creating beach waves over curly hair, follow your natural curl pattern. Use a curling iron with a smaller barrel, like the Beachwaver S. 75, to enhance and define curls.
Directions
Part hair in the middle, then section each side into top and bottom halves.
Hold the curing iron upright and curl one- to two-inch sections of hair away from your face.
Pull the iron straight down after curling.
“Avoid touching curls until they’re completely cool to prevent them from falling flat,” Ms. Potempa said. “Once cool, spray a flexible-hold hair spray onto a styling brush and gently brush out the waves.”


